Vodka for this blackberry cocktail provided by Sobieski.
I hosted a bachelorette party in August, and one of the things the guests seemed to really enjoy were all the cocktails I prepared. I was inspired by the combination of real fruit and vodka in those recipes, and decided to make my own creation along these lines with a special Halloween twist.
2 oz Sparkling Raspberry-Blackberry Water (I used Refreshe brand)
Ice
Sugar
Lemon Juice
Red & Yellow Food Coloring
Instructions
Add sugar to a small bowl and mix in 2 drops of red coloring and 3 drops of yellow food coloring to create an orange tint. In a separate bowl, pour in a small amount of lemon juice to dunk the edge of your glass in. Transfer the glass to the sugar bowl immediately and gently twist the rim around the sugar to coat the edge; set aside.
Place blackberries in a cocktail shaker and press them down with a fork to create a loose pulp. (You don't want to crush them completely - just break them up a little bit.) Add ice, vodka, and sparkling water; shake, pour into sugar coated glass and enjoy!
The idea for this came from the myriad raspberry cocktails I’ve been making – since blackberries are plentiful around here, I wanted to create a good blackberry cocktail, and I thought orange vodka would be a good pairing for a Halloween drink! I picked up the trick for smashing the berries from the Raspberry-Meyer Lemonade with Tequila recipe that was such a hit at the party. I figure that by crushing the berries a little bit, you’ll get a darker color in your drink for full goth effect.
To top it all off, I served this in my “Gothtini” glasses with skull martini shaker. I bought this set years ago and it’s been a favorite to pull out every Halloween!
Sobieski Vodka provided complimentary spirits for me to create my Halloween pudding shots.
I love Halloween, and I’m well known for my epic parties and spooky food. From rat-shaped meatloaf to cheeseball bats, I’ve whipped up all kinds of creations over the years! I’ve been having a lot of fun making specialty drinks recently, so I sat down and brainstormed some ideas for Halloween cocktails. As I mulled over ideas, I had a sudden flash of inspiration: Candy Corn Pudding Shots! I’ve been wanting to try my hand at pudding shots for a while, and I had a vision of layering puddings in a clear cup to create a candy corn effect. Here’s what I ended up with!
Combine milk with pudding mix in a large bowl, stir thoroughly, then pour in vodka and whipped topping; this will be easier if the whipped topping is thawed. Stir until you reach a smooth consistency.
Using clear, mini plastic snack cups, spoon in a very thin layer of the vanilla pudding, followed by a layer of orange pudding. Top with a thick layer of vanilla pudding to create the three-tier "Candy Corn" effect. The pudding rises as you add each layer, so the bottom vanilla layer should be the thinnest, followed by slightly more orange pudding and one final, generous layer of vanilla.
Once complete, store shots in fridge or freezer. Storing in the fridge will make a rich, creamy pudding, while storing in the fridge will create an ice cream-like consistency.
These are delicious! Unlike standard Jell-O shots, you’ll want to eat these with a spoon. Different pudding shot recipes recommend different things for storage – some say fridge and some say freezer, so I tried it both ways. When the shots are frozen, they become almost like an ice cream – I think this is my favorite way to eat them. It seemed to me that the alcohol flavor was less sharp when eating the frozen shot, although my taste buds may have been numbed from taste-testing a refrigerated shot first. 😉
In all, I was pretty happy with how these turned out. The middle layer didn’t turn out orange enough for my liking – I used butterscotch pudding only because it was the most “Orange” pudding I could find. I wonder if pudding shots could be mixed with standard Jell-O shots? If so, a straight-up Orange Jell-O would probably look better. This was my first attempt at making these, so it was an experiment as it so often is here at the Cooking Catastrophe kitchen!
Be warned, these are a little time-consuming to layer and require possibly more patience than I have. Because the technique is clearer to illustrate visually than to write, I shot a quick and dirty video while I was making these. This was totally unscripted as I had no plans of v-logging, as you can tell by my messy hair and kitchen! I’m not trying to compete with the Food Network here – think of it as hanging out in the kitchen with a friend while they show you a shortcut:
Since this recipe uses more vanilla pudding than the butterscotch, I found myself with a surplus of orange-tinted pudding shots. So I got a little bonus “Recipe” out of it:
Taking inspiration from these Frankenstein pudding cups, I drew pumpkin faces on the front of the snack cups, and poured the remainder of the butterscotch pudding in them. Remember, I was just using up a surplus of pudding from the first recipe, so these don’t taste like pumpkin – they’re just decorated to look like pumpkins. The first comment in the pudding shot recipe I adapted mentions pumpkin pie shots, so you could easily adapt this idea for pumpkin-flavored, pumpkin-face shots – which is way easier than the candy corn shots and looks just as cute, so this may have been the winning idea from today’s test kitchen!
Goodness Knows samples were provided for taste testing!
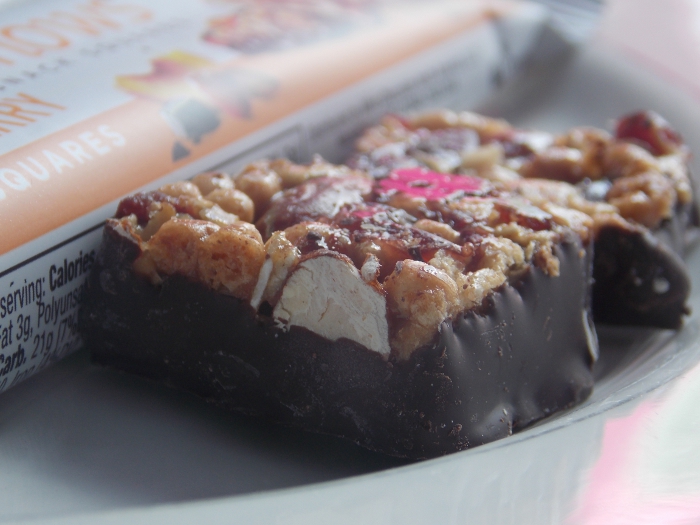
When I attended the PDX Tapas Competition in August, I was introduced to a delicious snack bar called Goodness Knows. I loved what I tried, so I was pleased to receive a few boxes in the mail of all 3 varieties to try out and share. I was already familiar with the Very Cranberry flavor from the event, and also received samples of their Nutty Apple and Peachy Cherry varieties.
These snack squares blend ingredients like oats, nuts and dried fruit with a dark chocolate base. It’s almost like a “Healthified” version of a Flapjack! They are super tasty – each bar contains 4 small snack squares, so they’re the perfect size to tuck in sack lunches or eat in between meals. We even tossed a box in the car during some of our long drives last month! Jai said his absolute favorite was the apple flavor – I still think cranberry might be my pick, if only because that’s the first one I tried so it’s a good taste association!
At the moment, Goodness Knows is only available in select markets – us Pacific Northwesters can pick them up in Portland and Seattle, and they can also be found in Dallas and Denver. But if you’re not in one of these areas, don’t fret – you can also order them online!
Have you gotten a chance to try Goodness Knows yet?
Spooktacular samples provided for ghastly gobbling! This post contains Amazon Associates links. Boo!
Today is October 1st, which means that it’s almost my favorite holiday: Halloween! I’m so excited for all the ghoulish goings-on. I’m a sucker for anything Halloween, so when I heard that our pals at Mike And Ike were releasing a Halloween variety, of course I had to check it out.
Just in time for All Hallow’s, Mike And Ike have released “Mummy’s Mix” and “Vampire Variety”. The boxes come emblazoned with adorably spooky artwork, and the candy is tinted with darker, fall-themed colors. The candy comes in the same tasty fruity flavors you’d expect, boasting tastes like lemon, raspberry, and fruit punch. I offered a handful to Jai and he said, “Yum! This is one of my favorite candies!”. I told him that I didn’t know that, and he said, “I didn’t either until the last time you reviewed a box of these. Now I love ’em!” So there you go – Mike And Ike’s newest fan!
In addition to the standard theater-style boxes, you can also pick these up in special trick-or-treat size bags – are these not the most adorable things ever?!
Even the Grim Reaper loves Mike And Ike Halloween candy!
Since FitBloggin’, I’ve been putting hemp hearts on everything. Salads, pudding, stir-frys – anything that seems like it could benefit from a handful of these! Manitoba Harvest sent along an 8 ounce bag of their Hemp Hearts so that I could try my hand at another dish, and I wanted to share this egg salad recipe that I came up with:
Combine all ingredients in a medium bowl, smashing the eggs with a fork until thoroughly mixed. Makes two large sandwiches. Best enjoyed on a loaf of Super Fast & Tasty Homemade Bread!
Would you like to try out my egg salad? Well, you’re in luck, because one Cooking Catastrophe reader will win an 8 oz bag of Manitoba Harvest’s Hemp Hearts to try out for themselves! To enter, just use the Rafflecopter widget below, which also contains the full official rules. Giveaway is open to residents of the US & Canada, 18+, and ends October 8th, 2013 at 11:00 PM PST.
Lately, it seems like I’ve been using different detergents for different loads of laundry. When I have a “Standard” load of laundry, I might use my homemade soap, and if I have an extra dirty load I might us a more super-powered/scented detergent – if only for the psychological difference that a heavy scent makes when cleaning something really dirty! So when I got a bag of Purex Ultrapacks in the mail last week, I knew right away this would be reserved for heavy-duty messes, since the bag touts its dirt-lifting additions of Oxi and Zout stain remover. I put it to the test with a load of dirty kitchen towels and rags, along with these pants that Jai had worn while laying tile. They were covered in dried grout, so I figure this should give the detergent a nice challenge.
The detergent is pre-portioned in handy little packs, so you just toss one in the machine and add your clothes. It recommends using two packs if you’re washing a large and/or heavily soiled load, however my extra-large load of icky rags was super clean with one pack.
The pants were spotless after I pulled them out of the wash, so the detergent had no problem getting out the grout. I forgot to take a photo of them after I pulled them out of the dryer, but since Jai wore them while tiling the very next day, they were once again covered in grout, washed again with UltraPacks, and once again, came out pristine. I’ll definitely be saving this for my grubbiest loads of laundry since it has done a great job thus far!
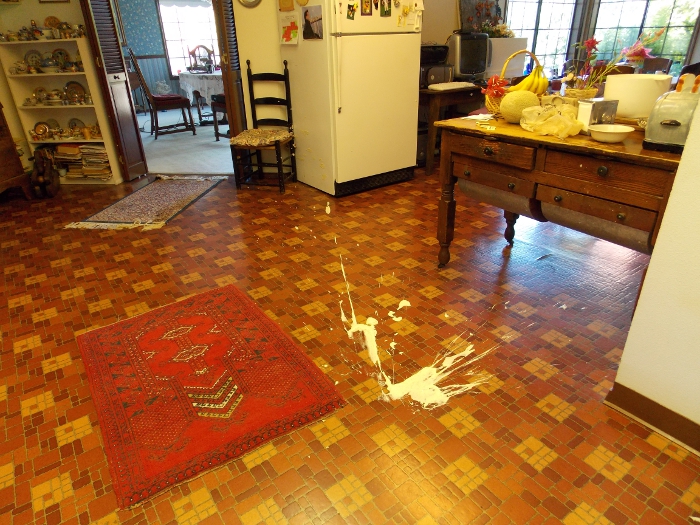
This was my Facebook status over the weekend. What could inspire such a cryptic update?
THAT! What you are looking at is an explosion of Ranch dressing. Let’s get a closeup so you can get a better view of how expansive this mess was:
Jai and I were housesitting for Grandma while she was out of town, and I had brought along a new appetizer maker that I wanted to try out. I had received it as a review item for MomStart, and wanted to make some fun sandwiches to snack on and serve to my friend who was coming over to celebrate her belated birthday. Grandma had a Costco-sized tub of Ranch dressing in her fridge, and I had gotten the brilliant idea of putting a little on my hors d’oeuvres. I was reaching for a spoon when the tub slipped out of my hands and onto the floor. Not only was the lid off, so the dressing went flying out of the top, but the plastic tub also shattered around the sides, so it went in every direction, reaching as far as the dining room carpet.
I tried mopping it up with paper towels, but the volume of Ranch was far too much; I knew I would need a mop. I couldn’t find a bucket anywhere, so I rinsed the mop in the bathtub…which began to back up. And that, my friends, is how I clogged up a bathrub with Ranch dressing.
It took a while, but we got the hair out of the bathtub that had been causing it to drain slowly and scrubbed every inch of the floors. Between mopping the floors and trying to stop Bob the dog from jumping on the counter and eating all the appetizers, it took me 3 hours to get these sandwiches made.
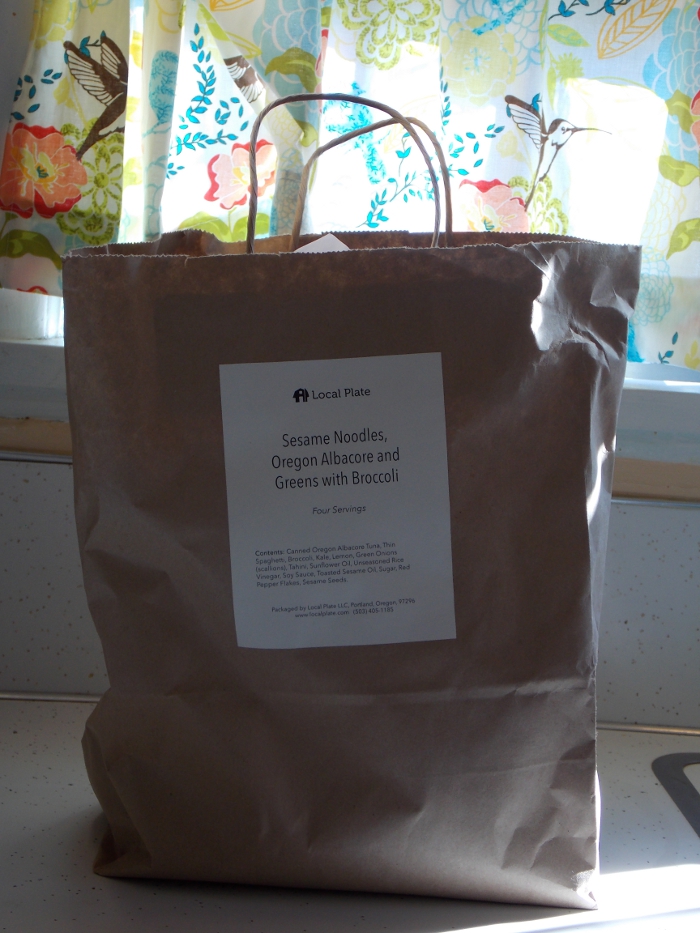
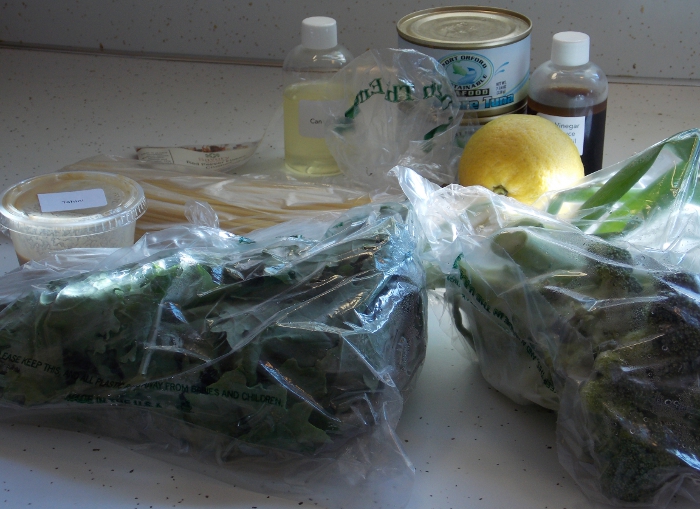
I recently discovered a cool Portland-based business called Local Plate, which creates dinner kits boasting ingredients from local farms and stores. These kits are seasonal and updated regularly according to what the farms have available that week; you can place your order online and either pick it up at Know Thy Food or opt to have it delivered straight to your door. Now, I live in Seaside, but since we have been spending so much time in Portland this month, I thought it would be fun to give the service a whirl and cook up one of these dinners over bachelorette weekend!
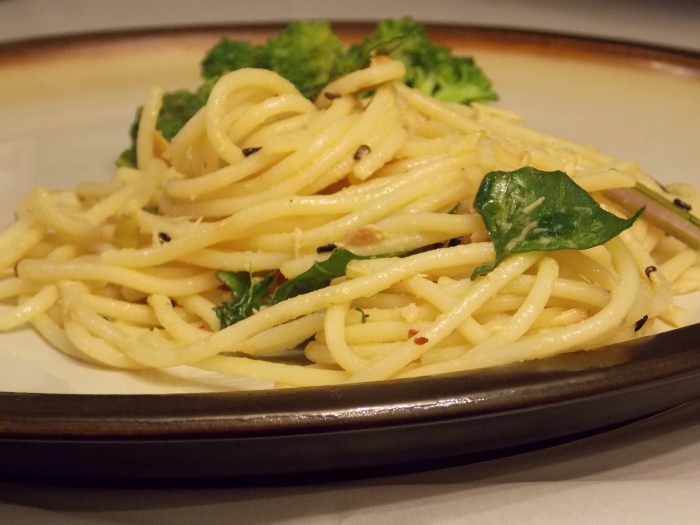
Ordering was effortless: I just logged onto the site, chose a meal kit – we decided on the sesame noodles with Oregon albacore, greens and a side of broccoli – and scheduled it to be delivered to my in-laws’ house where we were staying. If you’re not home when they deliver, they will leave the food in an insulated bag on your porch, which I thought was nice; they also give you a space on the order form to enter any special instructions they should be aware of to make delivery easier.
Local Plate delivers on Monday and Thursday, so I opted to have them drop off the meal kit on Thursday and made the dinner on Saturday before I left town, since the kits keep for 7 days.
This meal kit included everything you need to make dinner for 4 people except for salt, pepper, and olive oil; though honestly, if I was in a pinch I think I could have adapted this kit’s ingredients and made it even without the olive oil. The best part is that everything is pre-measured, so it’s all ready to go; some of the ingredients have even been combined when applicable, such as rice vinegar/soy sauce/sugar/sesame oil in one bottle. I was pretty punchy by the time I set about making this, since I had hosted the bachelorette party the night before and just walked in the door from the tapas competition that afternoon, so when I looked over the recipe included with the kit, my first thought was: That’s a lot of words. 😉 However, it was actually very straightforward and quite simple to prepare, even in my sleep-deprived state. Looking over the recipe today, I have to laugh, because I was so out of it that I totally misread some of the directions. I only cooked the whites of the scallions because somehow, I didn’t even see the part about adding the greens of the onions to the noodles. And because I am crazy, and tired, and crazy tired, I added the entire pan of chili oil instead of 2-3 tablespoons. Fortunately, this did not make it too hot or ruin the recipe – I honestly didn’t even realize I messed anything up until I reviewed the recipe again while writing this. Ha!!
This dinner was delicious! This makes a fresh, cold noodle dish mixed with albacore, spicy sesame seed tahini sauce, green onion and kale. The side was simple and tasty broccoli with lemon zest. It was really, really good!
Jai enjoyed seconds!
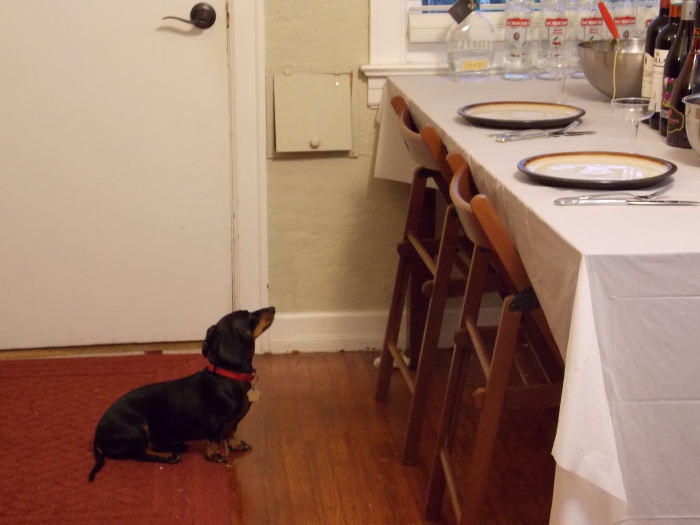
For the duration of the evening, Stella the foodie dog kept trying to sneakily jump up on the table to get to the bowl of noodles. Local Plate: So good, you’ll spend the whole evening whining and scheming to get a bite. 😉
When Local Plate said that this recipe makes “Quite a bit”, they aren’t kidding. The broccoli portion was modest, but the noodles made a HUGE bowl! We left the rest of in the fridge for Jai’s brother and sister-in-law to enjoy.
This meal kit retails for $40, which includes free delivery. $10 per serving is more than I would normally pay for a dinner since I’m cheapfrugal, however this service is a little different since the food is locally sourced. The onions came from the Gathering Together farm in Philomath, the albacore is from the southern Oregon coast via Port Orford Sustainable Seafood, with the seasonings coming from Portland’s Savory Spice Shop and other unlisted local retailers. I believe in supporting local businesses whenever I have the budget to do so, and I really love the concept of Local Plate. I was also impressed that they could afford to include delivery in the meal cost. I honestly think they ought to be charging danger pay for having to navigate through Portland’s labyrinth to deliver these meals! 😉
If you’re in Portland, check out the new meal kit offerings weekly on LocalPlate.com.
Complimentary admission, refreshments & goodie bags were provided!
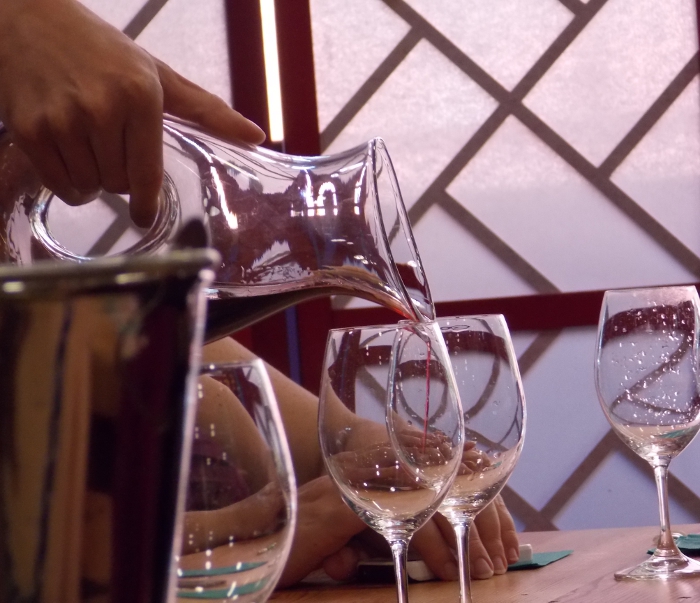
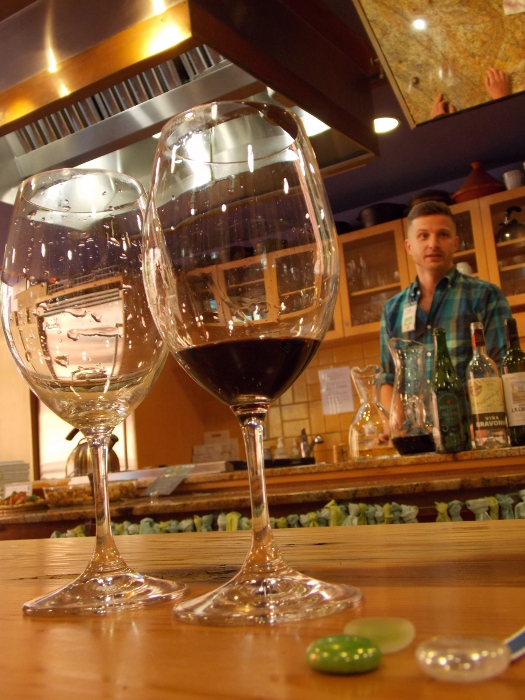
Yesterday, I attended a local food blogger event at the Pearl District Whole Foods Market in Portland. This fun gathering included a wine tasting and tapas competition. Each blogger brought their own unique tapas dish to share, and the dishes that received the most votes from attendees would take home some fun foodie prizes. I had already planned to be in Portland this weekend because I was throwing my sister-in-law’s bachelorette party on Friday night, so when I heard that this event was taking place on Saturday afternoon, I just had to go since I am crazy like to make the most of my trips. Marlynn of Urban Bliss Life said, “You look way too rested for having been at a bachelorette party last night!” I told her that I just wear good makeup. 😉
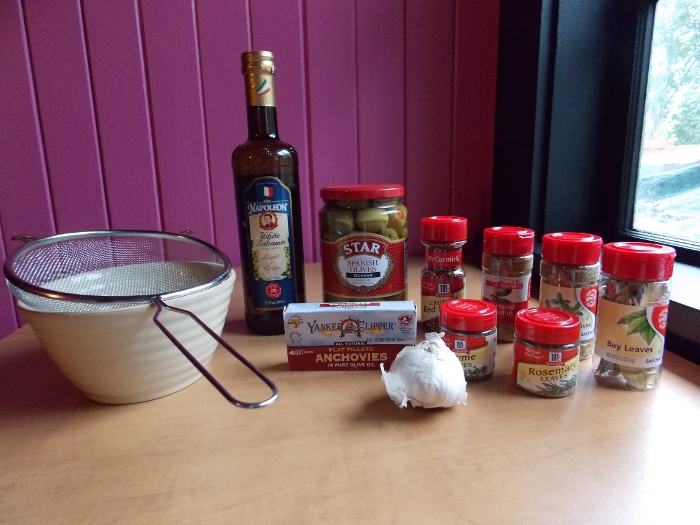
Going to a foodie event should have been intimidating, especially since I’ve never made a true tapas dish before. But my goal was merely to make a nice dish and enjoy myself, so I wasn’t worried about it being perfect or winning a blue ribbon as long as it tasted good. After some Googling, I decided to make Aceitunas a la Sevillana, since it was a fairly traditional tapas dish that is meant to be served at room temperature. This was important, because I knew that if I had to travel with something that had to be served hot or cold it would be a mess. I paired the olives with a loaf of my homemade bread:
Since I was staying with my in-laws for the party, I brought my breadmaker along and baked a loaf the morning of the tapas event so that it would be fresh. I also made a second batch of the olives and had a conveyor belt of bread going all weekend for the bachelorette party, so it all tied together nicely! I was satisfied with how my simple dish turned out, although I was face-palming afterwards when I realized that I forgot to bring the giant slab of butter I bought specifically for this event. Duh! I suppose people could put the olives on top of the bread, but it would have tasted about 10x better if I had actually brought the butter. I suppose this wouldn’t be Cooking Catastrophe without something silly happening, right? 😉 Still, everyone was really nice, and Pechluck from Pechluck’s Food Adventures even gave my bread a sweet shout-out on her blog. Aww!
The event started off with a lovely wine tasting. Whole Foods wine expert Justin spoke with us about different types of wine, including facts about “Sherry law” that I found interesting. Did you know that “Sherry” is a protected name meant to only be used for wine produced in a specific region of Spain, and the only reason that you’ll see American-made bottles called “Sherry” is because “Sherry lawyers don’t have as much money as the Champagne lawyers”, as we joked at the event. This might explain why they Sherry I tasted at the event was so different than what I’m used to – it wasn’t extremely sweet, like the bottles my family and I traditionally pick up around Christmastime.
After the wine tasting, Bee of The Spicy Bee talked about the history of tapas. Bee and I sat next to each other, which was fitting and also caused some funny miscommunication when people said our names since “Bee” and “Beeb” are so close phonetically!
As I expected, the event was full of amazing food. There were so many delicious and unique tastes, from spicy stuffed peppers to berry crisps to a cronut stuffed with meat. A “Cronut” is the newest food craze that people are lining up to taste – a combination croissant and donut. I can’t think of anything more Portland than a meaty cronut! Every single thing I ate was absolutely divine – and all the appetizers were so big that it was like eating a full dinner! I took so long eating that I accidentally missed the voting period, but I was actually glad because I don’t know how I could have chosen a favorite.
It was so fun meeting new bloggers, connecting with some “Face-to-face” for the first time, and even discovering some unexpected connections. I was chatting with Rachel of Tossing The Script, who said, “So you’re from Seaside – do you know (Name of one of my dear friends)?” I said, oh my gosh, I do! It turns out that Rachel knows my friend because she went to school in France with her. (This is the same friend who was waiting for her flight when I made my sugar-free fail!) I visited this friend twice while she was living in Poitiers, so Rachel and I realized that we must have met briefly all those years ago. Is this a small world, or what?!
As we were leaving, we were provided with fun gift bags as a thank-you for attending. They included decorative toothpicks from the organizer of the tapas event, Jenni at A Well Crafted Party; a free coupon for Black Rock coffee; a box of Pukka Licorice & Cinnamon tea (I brewed a cup of this today and it was nice!), and some yummy Goodness Knows Snack Squares. The bag was topped off by a cute card from Tiny Prints, who provided all kinds of cute napkins and placecards for the party. Appropriate, since the business cards which I brought to the event are also by Tiny Prints!
If you’d like to make your own simple tapas spread, here’s how I made mine:
Strain the olives over a bowl, reserving the water; place the olives back into the jar. Peel the garlic and add to the jar along with the anchovies, seasonings, and vinegar. Pour reserved water back into the jar until filled, screw on the lid, and shake the jar. Place on a counter to marinate for about 4 days, then store in the fridge for at least 3 days. Serve at room temperature.
Cooking Catastrophe is a participant in the Amazon Services LLC Associates Program, an affiliate advertising program designed to provide a means for sites to earn advertising fees by advertising and linking to Amazon.com.